Stories are like magic. They capture our attention, connect us to other people and allow us to peek into worlds beyond our own. Deep down, it’s our own stories we want to explore … and be the hero of.
Gamification, at its heart, is about stories. It’s about creating a playful learning space where the student can be the hero and explore the content of the course. Gamifying a course is made up things like onboarding, progress mechanics, and creating a narrative (story).
This lesson is a step-by-step guide on how you can take an existing course and begin to gamify it. We start by choosing a theme or story to base the course around, and then dive into the basics on how to use points, levels and badges to supercharge the engagement with your lessons and course material.
Beginner’s Note: Make sure you have taken a look at my first lesson in this series called The Beginner’s Guide to Making Graphics WITHOUT Photoshop, especially if you are just starting out making images. Then, check out 25 Storyline Ideas to Gamify your Course.
If I was going to visualize this lesson it would look like this:
Let’s get started with the basics of gamifying your online course.
Story or Theme
The most fun part of gamifying for me is creating the narrative (story) or theme that the course is going to be based on. Having a theme or story in your course offers the learner a context for the game. Are you fighting aliens? Solving a murder mystery? Trying to reach a destination, like in the Amazing Race or Survivor?
If you haven’t checked out 25 Storyline Ideas to Gamify Your Course, I would definitely recommend it. Lots of great ideas to get you started.
It’s important to have an end goal for your course. That might be solving the murder mystery, arriving at the destination, collecting all the hidden treasures or earning your Detective badge. Put something at the end for them to work towards.
Once you figure out how to turn your course into something fun with an end goal in mind, creating the rewards and other images becomes much easier. Imagine you are throwing a party. Once you figure out the theme, it’s easier to choose the costumes and decorations, too.
I’m going to be exploring more in depth ways you can use narratives in your courses in future articles, but here is a quick checklist to get you started.
Your Gamifying To Do List:
- Begin by duplicating your existing course so you can mess around with it in private.
- Then, create an awesome course logo that captures the idea of the gamified course.
- Next, onboarding, or showing them how the game (course) works. How do they get points? What is the end goal they are journeying towards? I recommend creating a screencast and actually showing learners the game (course) on your monitor.
- Create a set of points and badges (see below for details) and place them in your course.
- Finally, collect feedback from your learners through a survey tool like Surveymonkey. This step is really critical. Where did they get confused? What parts of your gamified course did they love? Do they have any ideas for you that could make the game more fun? I get my best ideas from the gaming experts … my students.
There are TONS more things you can do to gamify a course but that would be my advice for how to start.
So, you are probably wondering how to add those rewards and motivators I keep mentioning. Welcome to points, badges and levels …


Progress Mechanics (Points, Badges, Levels)
All the cute little images, rewards and badges that pull learners along and let them know how they are progressing are called … progress mechanics.
These are sort of the “gateway drugs” in terms of motivation. They get students excited about earning them, and it provides a little boost wherever they are placed in your course. As with anything novel, they lose their punch over time, especially if you hand them out too often. Using Smart Gamification (we’ll get more into this one in future articles) means adding gamified elements strategically, in the places you want to boost engagement and activity in the course.
Let’s break down the three big progress mechanic elements; points, badges and levels.
1. Points
You can award learners “points” for finishing tasks, passing exams, participating in a forum … whatever is most important to their success in the course.
Awarding points is almost impossible to actually do in most online courses, but it’s incredibly easy to pretend to do. In the gaming world they award points and keep track of them by programming and coding it into complex game software. We are going to achieve this with images.
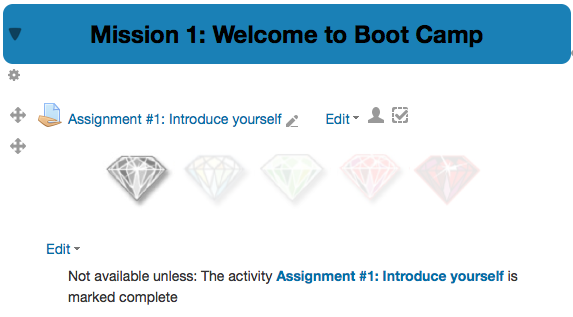
Here is a simple example in Moodle of awarding a point (a diamond in this case), for completing an activity.
The student completes the “Assignment #1: Introduce yourself” activity and the white diamond image appears. The diamond is hidden from the student until the task is finished. It suddenly “appears” to the student after it’s done. This makes course feel so much more dynamic to have it shifting and changing as the learner explores and works through the course.
Adding gamified objects, like the diamonds, is a three step process:
- Create the image
- Put the image online in your course (Moodle, in the examples here)
- Restrict Access to it (Decide how to award it)
a) Creating an image:
Gaming rewards, and the endorphin release we get from them, can be powerful motivators.
Anything that is part of set can be used to show progress. Gather some images together in a row, and you are ready to start handing out “points”. The images can be the same in different colors, or be completely different.
The images below that “fill up” are called progress bars. I would recommend just purchasing a set of these, already made. My favourite place is 123rf.com (<< click that link to see a bunch of progress bars). Download the image to your desktop. Upload it back to Google Slides so that you can take screen shots of all the pieces and separate them.
Points Example: Let’s use the diamonds as an example, because though they aren’t as easy as a complete set of “batteries” or a bunch of horizontal bars already made for you, they DO offer unlimited possibilities for students to collect things in the course.
When you are gamifying your course, the “diamonds” can be anything … elements in a periodic table … WHMIS safety symbols … Greek coins … Moodle skills … There is no limit to what you can dream up. Once you create a set of them (or buy them already created), you just dole them out as learners complete the desired activities. I often write a little note to go with the image like, “Great work. Only 4 more until you reach Level Two.” Adjust the note for the age of your learner.
Here is the complete set of diamonds that students need to earn:
To gradually give out 5 diamonds, I need to make 5 separate graphics that look like this:
Each graphic shows a row of five diamonds, with the diamonds transparent (faded) that aren’t earned yet.
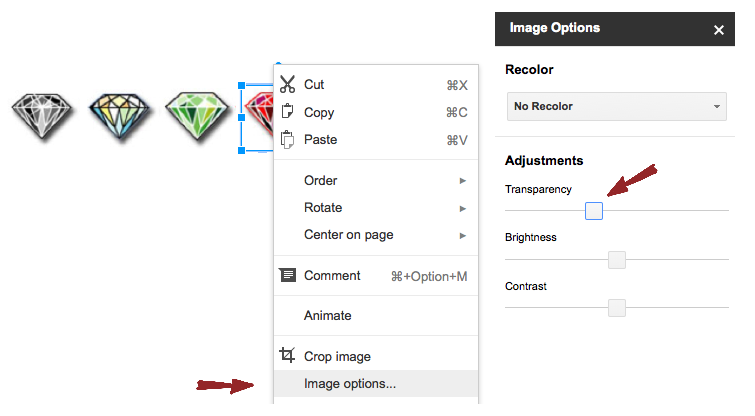
How the heck do you make things transparent:
Here’s how to make objects transparent, using Google Slides: (right click on the object)
As you can see, making the diamonds transparent let’s learners see how they are progressing and how many they still have to earn.
b) Put the image into your course and Restrict Access
Remember the graphic below? In Moodle, those diamonds are sitting in a label, with the Restrict Access setting turned on. I’m going to walk you through how to do that next.
Step One: Create a label and upload your diamonds (or whatever) into it.Then select the “Restrict Access” setting to NOT show those diamonds until the learner has completed a certain task. In the example below, it’s completing a Poetry Terms assignment.
Like this:
After saving the label, you now have a gamified image (the diamonds) that will appear when the student finishes the Poetry task. Once you do the above steps a few times it will become very easy to make an image, pop it in a label, and then restrict access to make it “appear” for the learner.
What should you do AFTER the student has collected all the diamonds (or whatever you created) in your course?
2. Badges
A badge is a more “permanent” reward, something that is displayed in the course all the time and can actually follow the learner around when the course is done. It is awarded for achieving something. It’s the virtual equivalent of a Girl Scout badge, or a ribbon at a track meet.
Badges are a great “next step” after you’ve had the student earn a set of points. For example, they collect all the diamonds and then they can earn a badge.
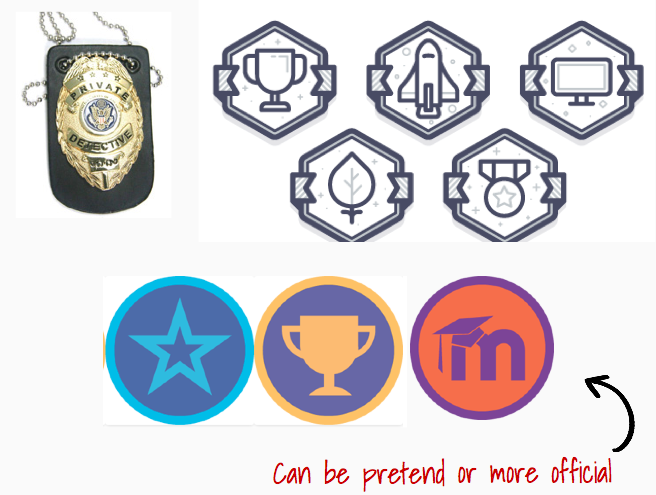
Here are some badges:
Here is an article I wrote called How Can Moodle Badges Transform Your Course? I highly recommend reading it to walk you through how to use badges (complete with free badges for you to use).
Finally, we end with levels.
3. Levels
Congrats. If you made it this far, you are about to learn the easiest gamifying tool there is … creating “levels” for the students to progress through.
The Easy Way:
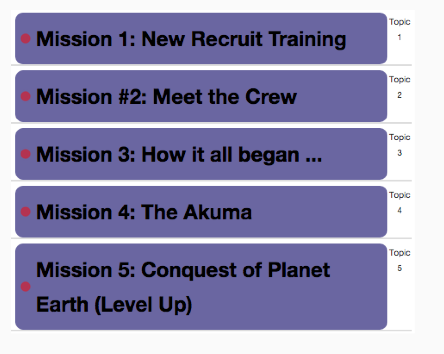
Here is an example of gamifying the dividers in a Moodle course:
Creating levels in this example was about simply changing the language you use when labeling things in the course. This could apply to lessons and assignments too. It isn’t Unit One: Introduction to Forensics … it’s Level One: Welcome to the Academy, Recruit!
Offering “sign posts” to show progress through the course, and furthering the theme or story, are the goal of having levels.
More Advanced:
Another ways to use levels is at a larger, whole-course level. A course is simply a box containing lessons and assessments. A single course set up doesn’t have to include all the course content. Your content can straddle several course set ups.
Picture this:
It’s all the same course for the students. As the designer, you just spread the material over two Moodle courses. The fact that the content of your course has been spread over two courses makes no difference to the student. They get ten lessons in Level One (the first Moodle course) and then click a badge or reward button that takes them to Level Two (the next Moodle course).
I’ve done this with large full year courses to give the second half of the year a little boost. It’s a built in motivator as level one closes in 5 weeks … 4 weeks … 3 weeks … etc.
You can make the Level Two course look different … have a different images and end goals, etc.
Obviously, this is a MUCH more advanced way of offering levels. I wouldn’t suggest doing it your first time around gamifying a course. I did want it on your radar, because in future lessons I want to give you some creative ways to use your course management system (CMS) in ways you aren’t used to, so that learners can have the maximum engagement online.
The Takeaway
You don’t have to be a game design company with a programmer, a graphic artist and a 100 nerds on staff. You just have to think up a fun spin on your course, learn to add a few graphics and begin to add engaging, playful elements to your course design.
Here is an article I wrote called How Can Moodle Badges Transform Your Course?
Check it out next!









Leave A Comment